1. Why use Elementor instead of other Website Builders?
As of October 2024, there are approximately 8.8 million websites currently using Elementor worldwide.
This number represents a significant increase from previous years, indicating Elementor’s growing popularity as a website builder.
WordPress is used by 62,5% of all websites and, according to w3techs, 26,1% of all wordpress websites use Elementor.
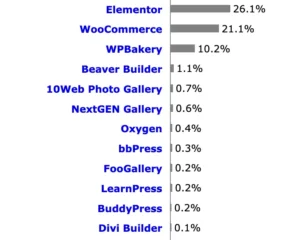
Impressive, right? 👏
In this guide I’ll show how to use Elementor to build your website, even if you have just the free version!
Here’s how to do it, step by step. ⤵️
1.1 Installation and Setup
Step 1: Installing WordPress
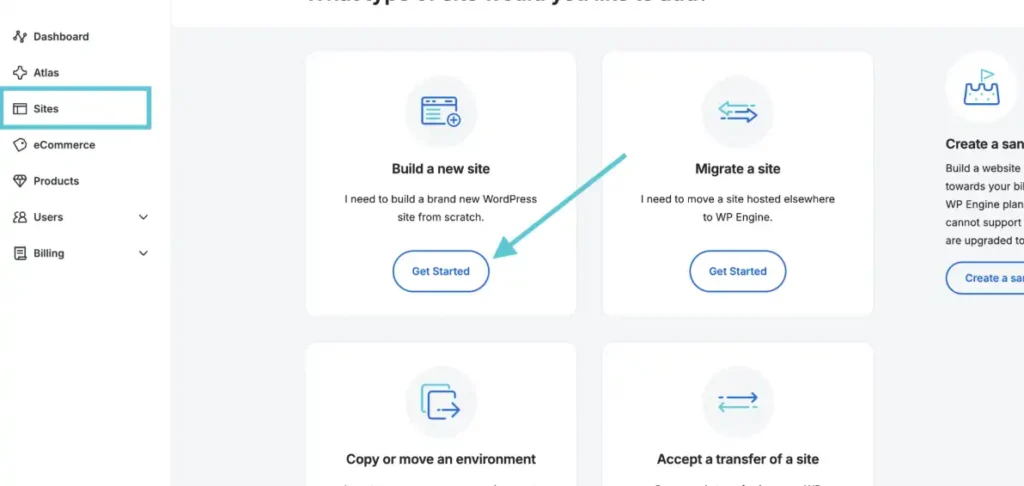
Before we dive into Elementor, you’ll need WordPress as the foundation. Don’t worry—it’s super easy! Most hosting providers offer a one-click WordPress installation, though the setup might vary slightly depending on which one you choose. Here are the providers I’ve personally tested and recommend for their ease of use:
- Elementor Hosting
- Kinsta
How to Install WordPress with Kinsta - SiteGround
How to Install WordPress with SiteGround - Bluehost
Bluehost one click install - WP Engine
How to Install WordPress with WP Engine
If you’re still undecided about which hosting service is best for you, check out our detailed Hosting Providers Comparison, where we break down the pros and cons of each, including performance, pricing, and support. Whether you need ultra-fast speeds or reliable customer service, our comparison guide will help you make the right choice.
Step 2: Defining Theme – Hello
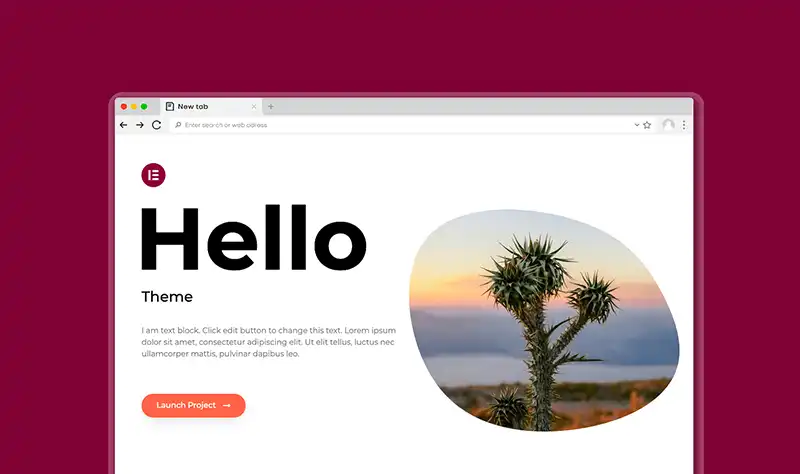
Choosing a theme that’s lightweight and compatible with Elementor is crucial for a smooth design experience. Hello Theme is the recommended choice by Elementor itself, as it’s clean, minimal, and fully compatible with Elementor.
Installing Hello Theme:
- Go to Appearance > Themes in your WordPress dashboard.
- Click Add New and search for Hello Theme.
- Click Install Now, then Activate to set it as your default theme.
Alternative Themes:
Other great themes for Elementor include Astra, GeneratePress, and OceanWP. These are fast, customizable, and Elementor-friendly.
Choosing a theme doesn’t lock you into a specific design. With Elementor, you can customize every aspect of your website’s appearance. Even though themes like Hello or Astra provide the foundation, you’ll have complete control to change the layout, style, and design using Elementor’s drag-and-drop editor.
Step 3: Setting Up Your Logo
Your logo is part of your website identity, so let’s get it set up properly.
Uploading the Logo:
- Navigate to Appearance > Customize in your WordPress dashboard.
- Click on Site Identity and select Logo.
- Upload your logo file (JPEG, PNG, or SVG) and adjust the size if necessary
Using SVG Files for Logos:
If you want to use an SVG file for your logo, you’ll first need to enable SVG support. Go to Elementor > Settings > Advanced and check the option for Enable Unfiltered File Uploads.
Troubleshooting SVG Uploads: Sometimes, even after enabling this option, SVG uploads might still be blocked. To fix this, install the SVG Support plugin, a lightweight plugin that allows you to upload SVG files seamlessly
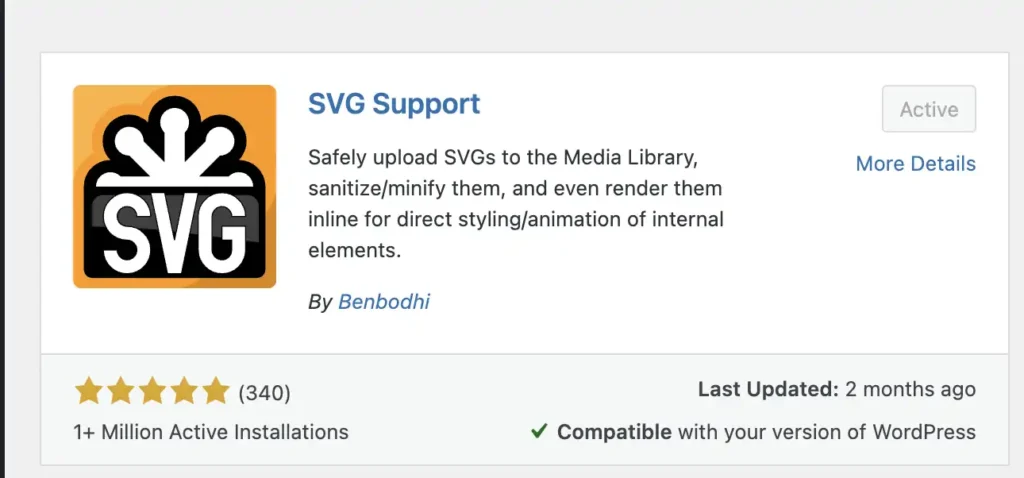
SVG Support Plugin
Step 4: Defining Your Homepage
Your homepage is often the most visited page on your website, so it’s important to set it up correctly. Here’s how to define a static homepage:
- Go to Pages > Add New in the WordPress dashboard.
- Name it something like “Home” and click Publish.
- Go to Settings > Reading in the WordPress dashboard.
- Under Your homepage displays, select A static page.Choose the “Home” page you just created from the dropdown menu and click
- Save Changes.
SEO Tip: Creating a static homepage helps establish the focus of your website and gives you more control over how it looks and functions.
Step 4: Installing and Activating Elementor
Now that WordPress is set up, let’s bring in the star of the show: Elementor!
- Access the WordPress Dashboard – Head to yourdomain.com/wp-admin and log in using your credentials.
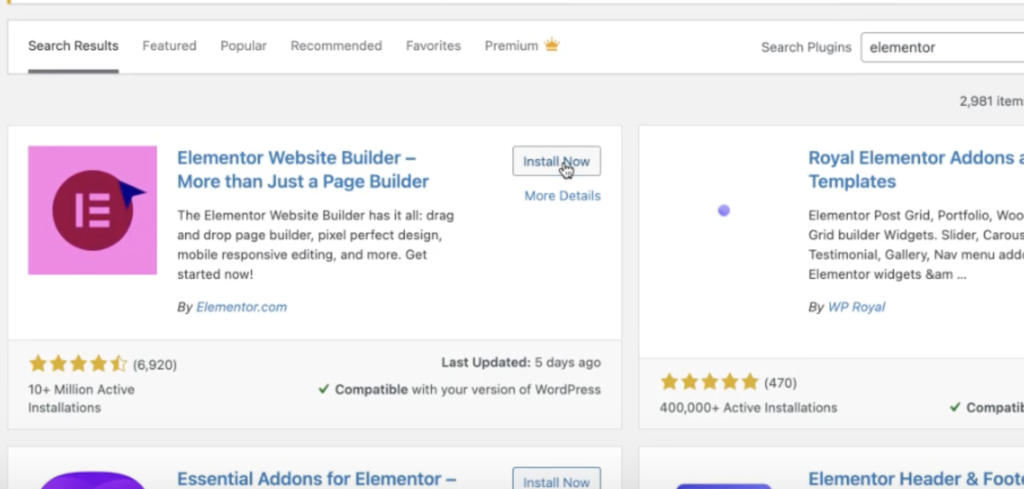
- Install Elementor. Go to Plugins > Add New in your WordPress dashboard.
- In the search bar, type “Elementor”.
- Hit Install Now next to Elementor Page Builder, and when it’s done, click Activate.
3. Upgrade to Elementor Pro (Optional, for extra features):
- For those who want to unlock advanced features (like Theme Builder, Pop-ups, and WooCommerce integration), Elementor Pro is a game-changer.
- Purchase Elementor Pro from Elementor.com, download the .zip file to your computer.
- Go back to Plugins > Add New > Upload Plugin in your WordPress dashboard.
- Upload the Elementor Pro .zip file and click Install Now.
- Once activated, connect your Elementor Pro license by navigating to Elementor > License and log in with your Elementor account. If you don’t have one, you can get one here!
Not sure if you need Elementor Pro? Take a look at our Elementor Free vs. Pro Comparison, where we cover all the key differences. We’ll help you decide which version is right for your project, whether you’re building a simple blog or a full-fledged eCommerce site.
Step 5: Defining Your Permalinks
Permalinks are the permanent URLs for your website’s pages and posts. To optimize your site for SEO and user experience, you’ll want to use a clean and readable URL structure.
Setting Permalinks:
- Go to Settings > Permalinks in your WordPress dashboard.
- Choose the Post Name option, which gives you URLs like yourdomain.com/sample-post/. This is much cleaner and more SEO-friendly than the default plain structure.
SEO Tip: Clean, descriptive permalinks improve both user experience and search engine rankings. Avoid special characters or complex structures in your URLs.
Step 6: Basic Setup for Elementor
With Elementor activated, let’s make sure the setup is right for you.
Adjust Global Settings:
- Head to Elementor > Settings from your WordPress dashboard.
- In the General tab, ensure that Post Types (Pages, Posts) are selected so you can use Elementor across your site. Note: If you’re building an e-commerce site you should also select Products.
- Enable Improved Asset Loading to keep your website fast and smooth.
Set Global Colors and Fonts:
- To maintain a cohesive design across your site, go to Elementor > Site Settings > Global Settings.
- Under Global Colors, define your Primary, Secondary, Text, and Accent colors.
- Under Global Fonts, choose typography for Headings and Body Text.
1.2 Elementor Interface Overview
Now that Elementor is all set up, let’s take a quick tour of its interface. Familiarizing yourself with the layout will make your design process a breeze.
Step 1: Accessing the Elementor Editor
- Go to any page or post in your WordPress dashboard. Example: Create a new page by going to Pages > Add New, name it something like “Home,” and click Edit with Elementor.
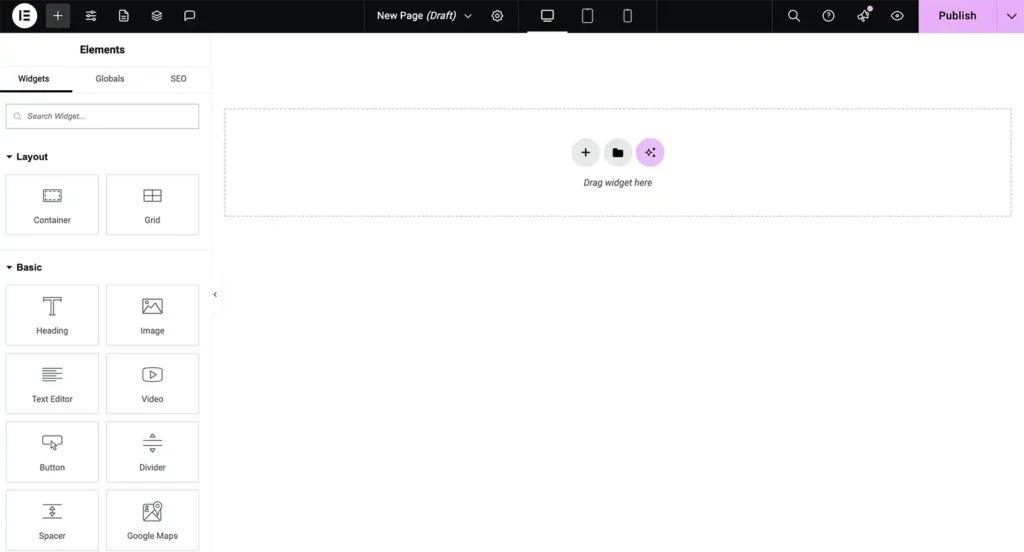
- Once inside, you’ll see two main areas: Editing Panel (on the left): This is where you’ll find all your widgets and settings. Drag and drop widgets from here to your page.
- Preview Area (on the right): This is where the magic happens! You’ll build your page here and see real-time updates.
Step 2: Adding and Customizing Widgets
To use widgets simply drag them from the left Editing Panel to the Preview Area.
Customize Widgets:
After dragging in your widget, use the three main tabs in the Editing Panel to customize it:
- Content Tab: Add your text, image, or content.
- Style Tab: Change fonts, colors, and other visual details.
- Advanced Tab: Adjust margins, padding, and even animations.
Step 3: Responsive Mode
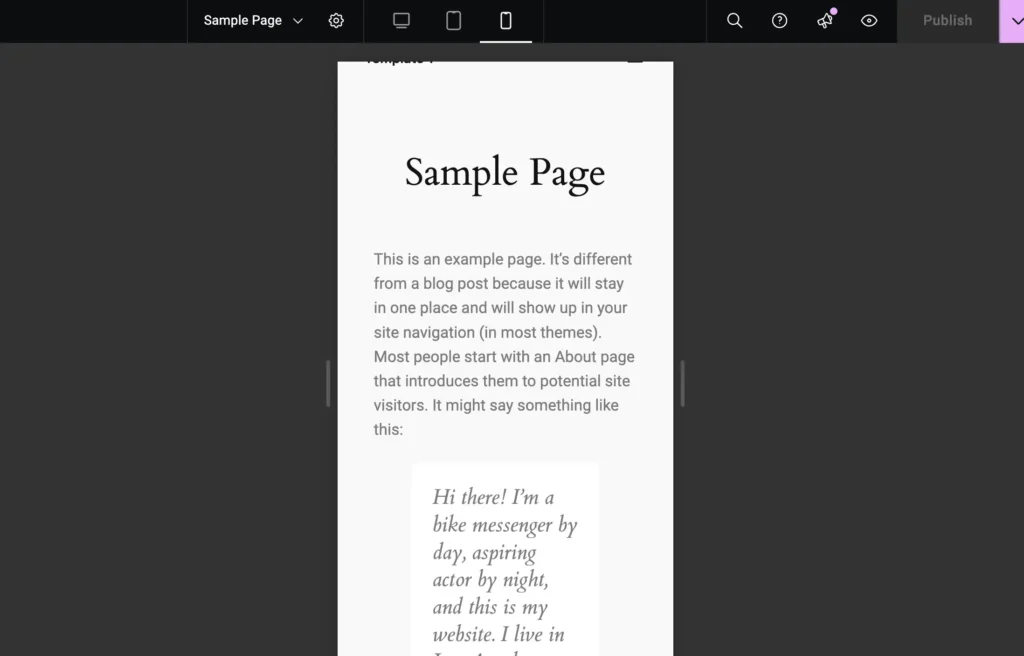
- Toggle between device views (Desktop, Tablet, Mobile) using the Responsive Mode icons at the bottom of the Elementor editor.
- Mobile Customization:switch to Mobile View and adjust font sizes, button sizes, or hide elements that don’t fit well on smaller screens.
Conclusion for Section 1
Congratulations! You’ve now installed Elementor, explored the interface, and learned how to add widgets and customize them. This is just the beginning of your journey—next, we’ll dive deeper into building beautiful, responsive pages.
2. Working with Elementor Free Widgets
2. Exploring Elementor Free Widgets
Elementor’s free version offers over 30 widgets, giving you all the essential tools you need to build a functional and visually appealing website. Let’s explore what each widget does and how you can customize it.
2.1 Basic Widgets
Heading Widget
The Heading Widget allows you to add headings to your pages (H1, H2, etc.), which are essential for structuring content and improving SEO.
- Customizations:
- Text: Change the heading text and set the tag (H1, H2, etc.).
- Style: Customize the typography (font, size, weight), text color, and alignment.
- Advanced: Add margins, padding, motion effects, and adjust responsive visibility.
Text Editor Widget
The Text Editor Widget is a rich text area where you can add paragraphs, links, and basic formatting to your content.
- Customizations:
- Content: Add text, links, and lists directly into the widget.
- Style: Control font size, color, line height, and alignment.
- Advanced: Add margins, padding, background colors, and border options for styling.
Image Widget
The Image Widget lets you add images anywhere on your page, with full control over size, alignment, and linking.
- Customizations:
- Content: Upload an image, adjust image size, and add an optional link.
- Style: Add image borders, shadow effects, and control opacity.
- Advanced: Control margins, padding, and motion effects like hover animations.
Button Widget
Use the Button Widget to add a clickable call-to-action to your website.
- Customizations:
- Content: Customize the button text, link, and alignment.
- Style: Adjust button size, background color, border-radius, and typography.
- Advanced: Add hover effects, adjust padding, and manage responsive visibility.
Icon Widget
The Icon Widget allows you to add scalable vector icons from Font Awesome or upload your own SVGs.
- Customizations:
- Content: Choose an icon from the library or upload an SVG.
- Style: Customize icon size, color, and positioning.
- Advanced: Add animations or motion effects to the icon, and control responsive visibility.
2.2 Layout and Structure Widgets
Section and Columns
Sections and Columns are the building blocks of Elementor, allowing you to create layouts with multiple rows and columns.
- Customizations:
- Content: Add multiple columns within a section and adjust column widths.
- Style: Control background colors, images, borders, and column gaps.
- Advanced: Adjust padding, margins, z-index, and add entrance animations.
Divider Widget
The Divider Widget allows you to add horizontal lines to break up content sections.
- Customizations:
- Content: Choose between solid, double, or dashed line styles.
- Style: Adjust line width, color, and gap from surrounding content.
- Advanced: Add margins, padding, and motion effects.
Spacer Widget
The Spacer Widget helps you create space between elements, providing control over vertical or horizontal gaps.
- Customizations:
- Style: Adjust the height or width of the space added.
- Advanced: Add responsive controls to adjust spacing on mobile or desktop only.
2.3 Media Widgets
Video Widget
The Video Widget allows you to embed YouTube or Vimeo videos directly on your page.
- Customizations:
- Content: Add a video URL, set autoplay, mute, and start times.
- Style: Customize video size, aspect ratio, and borders.
- Advanced: Add motion effects, custom CSS, and adjust margins and padding.
Image Gallery Widget
The Image Gallery Widget lets you display a collection of images in a grid or masonry layout.
- Customizations:
- Content: Select multiple images, adjust the number of columns, and enable lightbox.
- Style: Control spacing between images, border width, and hover effects.
- Advanced: Add animation effects, control visibility, and adjust spacing.
2.4 Limitations of Elementor Free and How to Overcome Them
While Elementor Free offers a robust set of widgets, there are a few important features that are missing. Here’s a look at the limitations you may encounter and some ways to overcome them without upgrading to Pro.
1. No Built-in Form Widget
Elementor Free doesn’t include a native Form Widget, which is crucial for creating contact forms, lead capture forms, or surveys.
- Workaround: You can use free form plugins like WPForms Lite or Contact Form 7 to easily add forms to your Elementor pages. Both plugins offer drag-and-drop form builders and are compatible with Elementor through shortcodes.
2. Limited Design Options for Pop-ups
Pop-ups are not available in Elementor Free, making it challenging to create exit-intent pop-ups, lead generation pop-ups, or promotional banners.
- Workaround: You can use the free Popup Maker plugin, which integrates with Elementor and allows you to create pop-ups with various triggers (e.g., click-based, exit intent).
3. No Theme Builder
The free version of Elementor doesn’t allow you to fully customize your site’s headers, footers, or archive pages.
- Workaround: You can still modify some theme elements by using a customizable theme like Astra or GeneratePress. These themes offer a variety of free customization options for the site’s layout, headers, and footers.
4. No WooCommerce Widgets
If you’re running an online store with WooCommerce, Elementor Free doesn’t offer built-in widgets for displaying products, creating custom product pages, or building checkout pages.
- Workaround: Use free WooCommerce plugins like WooCommerce Blocks, which lets you add products, categories, and checkout blocks to your Elementor pages. However, it won’t provide the same level of customization that Pro does.
2.5 When to Consider Upgrading to Elementor Pro
If you find that you need more advanced features like fully customizable forms, pop-ups, and a theme builder to take full control of your website’s design, it might be time to consider upgrading to Elementor Pro.
Elementor Pro opens the door to even more widgets and advanced tools, such as:
- The Form Widget for creating custom, integrated forms.
- The Theme Builder for fully customizing your site’s headers, footers, and archive pages.
- WooCommerce Widgets to build custom product and checkout pages.
If you’re running a business or need advanced design capabilities, the investment in Elementor Pro can save you time and effort by eliminating the need for additional plugins and offering a smoother, integrated design experience.
Conclusion for Section 2
Elementor’s free widgets give you everything you need to build a fully functional website. From headings and buttons to galleries and videos, you have a variety of customization options at your fingertips. In the next section, I’ll dive into the advanced widgets that become available with Elementor Pro.
3. Unlocking Elementor Pro Widgets
Elementor Pro unlocks an even wider range of powerful widgets, allowing you to create more complex and dynamic websites with ease. Let’s explore the widgets you get with Elementor Pro and how they can elevate your designs.
3.1 Advanced Design Widgets
Form Widget
The Form Widget is one of the most powerful tools in Elementor Pro, allowing you to create customized forms for lead generation, contact, and more.
- Customizations:
- Content: Add various field types (text, email, radio buttons, etc.) and customize the form structure.
- Style: Adjust the spacing, button size, and input field styling.
- Advanced: Set up integrations with CRMs, email marketing platforms, and more using webhooks or native integrations.
Slides Widget
The Slides Widget enables you to create eye-catching image or text sliders with full customization options.
- Customizations:
- Content: Add multiple slides with text, images, and call-to-action buttons.
- Style: Customize slide backgrounds, navigation arrows, and transition effects.
- Advanced: Enable autoplay, loop, and add animations for smooth transitions.
3.2 Marketing and Conversion Widgets
Pop-up Builder
The Pop-up Builder in Elementor Pro allows you to create customizable pop-ups for lead generation, promotions, or announcements.
- Customizations:
- Content: Design pop-ups with Elementor widgets like forms, images, and buttons.
- Display Conditions: Set triggers such as exit intent, scroll percentage, or timing for when the pop-up should appear.
- Advanced: Customize the size, layout, and animations of the pop-up.
Pricing Table Widget
The Pricing Table Widget is great for showcasing pricing plans or packages with visually appealing tables.
- Customizations:
- Content: Add pricing tiers, features, and call-to-action buttons.
- Style: Adjust column spacing, colors, typography, and button styles.
- Advanced: Add hover effects and animations to make the pricing table interactive.
3.3 WooCommerce Widgets
For those running an online store, Elementor Pro provides specialized WooCommerce Widgets to design product pages, checkout pages, and more.
Product Widgets
The WooCommerce Product Widgets allow you to display products, categories, and product data on fully customized product pages.
- Customizations:
- Content: Add product titles, images, pricing, and descriptions.
- Style: Control spacing, typography, and image hover effects.
- Advanced: Integrate product reviews, upsells, and related products into the design.
Conclusion for Section 3
With Elementor Pro’s advanced widgets, you can design highly dynamic and professional websites. From custom forms and pop-ups to WooCommerce product pages, Elementor Pro’s widgets give you full creative freedom to build a feature-rich website.
4. Creating Dynamic Content with Elementor Pro
Dynamic content allows you to build pages that automatically pull in data from posts, custom fields, and other sources, making your site easier to manage and more powerful. With Elementor Pro, you can leverage dynamic content to create personalized experiences for your users, all while keeping things efficient on the back end.
4.1 What Is Dynamic Content?
Dynamic content refers to information on your website that is automatically updated based on the source (like posts, custom fields, or product information), instead of manually entering the same data multiple times. This is especially useful for blogs, eCommerce stores, and portfolios where content changes regularly.
With Elementor Pro, you can easily add dynamic elements to your pages, like dynamic text, images, post information, and more.
4.2 The Theme Builder: Customizing Your Site’s Structure
The Theme Builder in Elementor Pro lets you create custom layouts for different parts of your website (like headers, footers, and post templates) that dynamically pull in data.
How to Use the Theme Builder
- Go to Templates > Theme Builder in your WordPress dashboard.
- Choose which part of your theme you want to create:
- Header: Design a global header for your entire site.
- Footer: Customize a footer with dynamic copyright dates or site navigation.
- Single Post: Create a template for blog posts that automatically pulls in the title, author, date, and content.
- Archive Pages: Build a custom layout for category or tag pages that dynamically displays your posts.
Example: Creating a Dynamic Blog Post Template
- Open the Theme Builder and select Single Post.
- Drag the Post Title widget, the Post Content widget, and the Post Author widget onto the page.
- Use Dynamic Tags to pull in additional data, like the post’s Publish Date or Categories.
- Style your post template with colors, fonts, and spacing that will apply to every blog post automatically.
Advanced Tip: You can even add a Post Navigation widget to help readers move between posts seamlessly.
4.3 Dynamic Tags: Making Content Flexible
The Dynamic Tags feature in Elementor Pro lets you display dynamic content pulled from your WordPress database, such as post titles, metadata, or custom fields.
Using Dynamic Tags
- Select a widget, such as a Heading or Text Editor.
- Next to the content field, click the Dynamic Tags icon (the database symbol).
- Choose the type of dynamic content you want to pull in:
- Post Title: Automatically insert the title of the post you’re editing.
- Post Excerpt: Add an excerpt of your post.
- Author Name: Show the name of the post’s author.
- For more advanced use cases, use Advanced Custom Fields (ACF) to display custom content (like product specifications or user profiles) dynamically.
Example: Use Dynamic Tags to display a user’s name dynamically on a personalized page (e.g., “Welcome back, [User Name]”).
4.4 Advanced Custom Fields (ACF) Integration
With ACF and Elementor Pro, you can display custom data fields dynamically on your website. This is especially useful for businesses needing custom content like product details, event information, or team bios.
How to Display ACF Data Dynamically
- First, install and set up the ACF plugin to create custom fields for your posts or products (e.g., “Product Specs” or “Event Date”).
- In Elementor Pro, select a widget (like a Heading or Text Widget), click the Dynamic Tags icon, and choose the ACF Field.
- Select the custom field you created in ACF (e.g., “Event Date”), and it will automatically pull the data into the widget.
Example: Display specific product information (like material, weight, or size) dynamically on every product page.
4.5 Building Dynamic WooCommerce Stores
If you run an online store, Elementor Pro’s dynamic WooCommerce features allow you to build fully customized product and checkout pages that automatically pull in product details, prices, and inventory.
How to Use WooCommerce Widgets for Dynamic Product Pages
- Go to the Theme Builder and select Single Product.
- Use the WooCommerce Product Title, Product Image, Product Price, and Product Description widgets to create a custom layout.
- These widgets automatically pull in product data, so each product page displays the right information without manual updates.
Advanced Tip: You can add Related Products and Upsells dynamically to encourage users to explore more products.
4.6 Creating Dynamic Listing Pages with Post Grids
With Elementor Pro, you can create listing pages that automatically pull in blog posts, portfolio items, or products using the Post Grid Widget.
How to Build a Dynamic Listing Page
- Add a Post Grid Widget to any page.
- Customize the layout to display a list or grid of posts, products, or other content.
- Use Dynamic Tags to display the post title, featured image, or date for each item automatically.
Example: Create a portfolio page that displays all your latest projects in a grid layout, with each project dynamically pulling in its details.
Conclusion: Making Your Site Smarter with Dynamic Content
Using Elementor Pro’s dynamic content features, you can build smarter websites that automatically update and adjust based on the data in your WordPress database. From custom blog templates and WooCommerce product pages to advanced custom fields, Elementor Pro takes the complexity out of dynamic content creation.
Great! For Section 5, we can focus on Global Design Settings and Consistency Across Your Website using Elementor Pro. This section will teach users how to create global styles for fonts, colors, and more, which ensures a consistent look across the entire site while making future design changes faster and easier.
Here’s how I suggest structuring Section 5: Global Design Settings with Elementor Pro:
5. Global Design Settings with Elementor Pro
Consistency is key when designing a professional website. With Elementor Pro, you can set global design rules for colors, typography, and more, ensuring a unified look across all your pages. Plus, these settings make future design tweaks easy—you only need to change things once!
5.1 Why Use Global Settings?
Global settings let you define your site’s colors, fonts, and other styling options in one place. Once set, any changes you make to these global styles will automatically apply across your entire website. This saves time and ensures your design is consistent across all pages.
- Example: If you decide to change your brand’s primary color, you can update the global color, and it will automatically update across every page where the color is used.
5.2 Setting Global Colors
Global colors allow you to create a color palette for your website that can be reused across widgets and pages, ensuring consistency.
How to Set Global Colors
- Go to Site Settings by clicking the hamburger menu (three lines) in the top left of the Elementor editor.
- Select Global Colors under the Design System tab.
- Add and define your primary, secondary, text, and accent colors. These colors will be available in every widget’s color settings.
- Customizations:
- Primary color for headings or buttons.
- Secondary color for background accents or secondary buttons.
- Text color for body content and paragraphs.
Advanced Tip: You can assign specific colors to individual elements like buttons, links, or headers, and then make global adjustments later without needing to edit each element manually.
5.3 Setting Global Fonts
Just like colors, Global Fonts allow you to define typography for headings, body text, and other elements that will be consistent throughout your website.
How to Set Global Fonts
- In the Site Settings menu, click on Global Fonts.
- Define fonts for Primary (H1), Secondary (H2), Text (Body), and Accent.
- Customize each font’s typography settings, including font family, size, weight, and line height.
- Customizations:
- Use a bold font for headings (e.g., Montserrat).
- Choose a readable font for body text (e.g., Roboto, size 16px).
- Set consistent line height and spacing for mobile readability.
Example: Defining a large, bold heading font across your entire site will ensure consistency without needing to manually adjust each heading widget.
5.4 Global Widgets: Consistent Design for Reused Elements
Global Widgets allow you to design an element once and reuse it across multiple pages. Any updates to the global widget will automatically update everywhere it is used.
How to Create a Global Widget
- Design any widget (e.g., a button, heading, or call-to-action section).
- Right-click the widget and select Save as Global.
- Name the global widget and save it.
- You can now drag this widget from the Global section of the Elementor editor onto any page.
- Example: Save a Call-to-Action Section as a global widget and reuse it across multiple pages. If you ever need to update the CTA text or style, you can do it once and apply the changes everywhere the widget is used.
5.5 Global Custom CSS: Site-Wide Customizations
For more advanced users, Elementor Pro allows you to add Global Custom CSS, which applies custom styling across your entire website.
How to Add Global Custom CSS
- Go to Site Settings and click Custom CSS.
- Add your custom CSS rules that will apply to the whole site.
- Example: Customize how buttons look across the site with CSS.
- The custom CSS will automatically be applied across all pages where those styles are used.
- Example: Use Global CSS to change all button colors, border styles, or add hover effects site-wide without needing to apply styles to each individual button.
Advanced Tip: Combine Global CSS with Elementor’s responsive design tools to create mobile-specific styles, ensuring your design looks great on any device.
5.6 Managing Global Settings for Mobile
Elementor Pro’s global settings make it easy to ensure your site remains consistent across different devices, including tablets and mobile phones.
How to Adjust Global Settings for Mobile
- Switch to Mobile View in the Elementor editor.
- Go to Site Settings > Global Fonts and adjust font sizes for mobile devices (e.g., reducing heading sizes for mobile readability).
- Adjust Global Colors for better contrast or visibility on smaller screens.
- Example: On mobile, you might reduce the font size of headings to avoid overcrowding the screen, ensuring a better user experience.
Advanced Tip: Use Elementor’s Responsive Mode to preview and adjust global settings specifically for tablets and mobile, so your site looks consistent and polished on any device.
5.7 Updating Global Styles Across Your Site
Once your global settings are defined, you can easily make updates site-wide, saving time and effort while keeping everything consistent.
How to Update Global Styles
- Return to Site Settings in the Elementor editor.
- Update your Global Colors, Fonts, or Global Widgets.
- Any changes you make will be automatically applied to all pages and elements where those global styles are used.
- Example: If your brand colors change, you can update the primary color in Global Colors and instantly apply it across your entire website without manually editing individual elements.
Conclusion: The Power of Global Design Settings
Using Elementor Pro’s global settings, you can keep your website’s design consistent and easy to manage. Whether it’s adjusting fonts and colors, using global widgets, or customizing with global CSS, these features give you full control over your site’s design while saving time.
6. Optimizing Your Elementor Site for Performance and SEO
Why is site speed and SEO important? A fast-loading, SEO-friendly website not only provides a better user experience but also improves your chances of ranking higher on search engines like Google. In this section, I’ll guide you through the steps to optimize your Elementor website for performance and search engine optimization (SEO).
6.1 Improving Site Speed
Site speed directly impacts user experience and SEO rankings. A slow website can frustrate visitors and cause them to leave before your page even loads.
How to Improve Your Site’s Speed
- Use a Caching Plugin:
- Install and activate a caching plugin like WP Rocket, W3 Total Cache, or LiteSpeed Cache.
- Caching stores a static version of your site, reducing load times for returning visitors.
- Optimize Your Images:
- Compress images before uploading using tools like TinyPNG or ShortPixel.
- Convert images to WebP format (a modern format that offers smaller file sizes without losing quality).
- Enable Lazy Loading to load images only when they appear in the viewport.
- Minimize CSS and JavaScript:
- Use the minification options available in caching plugins to reduce the size of CSS and JS files, improving load times.
Pro Tip: Keep an eye on your site speed with tools like Google PageSpeed Insights or GTmetrix to identify any performance bottlenecks.
6.2 SEO Best Practices for Elementor Sites Using Rank Math
Optimizing your website for search engines is essential for driving organic traffic and improving visibility. Here’s how to make sure your Elementor site is SEO-friendly using Rank Math.
Setting Up Rank Math SEO
Rank Math is a powerful SEO plugin that helps you optimize your website’s content, structure, and visibility.
- Install and activate the Rank Math SEO plugin.
- Run the Setup Wizard, which will guide you through the basic configuration.
- Choose your SEO mode: Simple or Advanced (for more control).
- Connect your Rank Math account to enable Google Search Console integration.
- For each page or post, scroll down to the Rank Math SEO Meta Box in the WordPress editor:
- Set your Focus Keyword (e.g., “Elementor page builder”).
- Write a compelling Meta Description that summarizes the page content and includes your keyword.
- Check the SEO analysis provided by Rank Math to ensure you’re following best practices.
Optimizing Headings and Content Structure
Proper use of headings (H1, H2, etc.) not only improves readability but also helps search engines understand your content structure.
- Ensure each page has only one H1 tag (typically the main heading).
- Use H2 and H3 tags to organize subheadings and break up content into sections.
- Include focus keywords in headings where it feels natural and improves clarity.
SEO Tip: Rank Math’s Content Analysis feature provides real-time feedback on keyword usage, heading structure, and readability to help you fine-tune your content.
6.3 Optimizing for Mobile SEO
With Google’s mobile-first indexing, optimizing for mobile is critical for SEO success. Here’s how to ensure your Elementor site is mobile-friendly.
Improving Mobile Page Speed
- Compress Images for faster load times on mobile.
- Enable Lazy Loading so that images and videos load only when they’re visible to users.
- Test your site’s mobile speed using Google PageSpeed Insights and follow the suggestions provided to enhance performance.
Creating a Mobile-Friendly Design
- Switch to Responsive Mode in the Elementor editor and adjust layouts for mobile devices.
- Make sure text is large enough to read (16px or larger).
- Ensure buttons and links are easy to tap, with plenty of padding around them.
- Use Mobile-Specific Adjustments to tweak font sizes, button sizes, and spacing for smaller screens without affecting desktop design.
SEO Tip: Rank Math offers a Mobile Usability Checklist, making sure your mobile design passes the necessary checks to be Google-friendly.
6.4 Structured Data and Schema Markup with Rank Math
Schema markup helps search engines understand your site better and can improve how your site appears in search results (like adding star ratings or rich snippets).
How to Add Schema Markup with Rank Math
- Go to Rank Math > Titles & Meta in the WordPress dashboard.
- Enable the Schema Markup module in Rank Math.
- For each post or page, scroll down to the Schema tab in the Rank Math meta box.
- Choose the type of structured data you want to add (e.g., FAQ schema, Product schema, or Article schema).
- Rank Math automatically integrates structured data into your site, helping Google display rich snippets in search results.
Example: If you run an online store, you can use Product Schema to display product details like pricing and availability directly in search results, boosting click-through rates.
Conclusion: Fast, SEO-Friendly Websites Win
Optimizing your Elementor website for performance and SEO will make it faster, rank higher on search engines, and deliver a better user experience. From caching and image optimization to setting up Rank Math SEO and mobile-first design, these steps will ensure your site is ready to compete in the search rankings.
7. Tracking, Analytics, and Conversion Optimization
Why is tracking important? Data-driven insights allow you to monitor your site’s performance, track user behavior, and optimize conversions. With tools like Google Analytics, Facebook Pixel, and A/B testing, you can turn visitor data into actionable insights to improve your site.
7.1 Setting Up Google Analytics
Google Analytics is a must-have tool for tracking website traffic, user behavior, and overall performance. It helps you understand how visitors are interacting with your Elementor site.
How to Set Up Google Analytics
- Create a Google Analytics account:
- Go to Google Analytics and create an account.
- Set up a property for your website and get your tracking ID.
- Add Google Analytics to Your Site:
- Install a plugin like Rank Math or MonsterInsights to easily add the tracking code to your website.
- Navigate to Rank Math > General Settings > Analytics and enter your Google Analytics tracking ID.
- Verify that the tracking code is active by checking the Google Analytics Realtime report for live traffic.
7.2 Installing Facebook Pixel for Conversion Tracking
Facebook Pixel allows you to track conversions from Facebook ads, retarget website visitors, and optimize your ad campaigns based on user behavior.
How to Install Facebook Pixel
- Create a Facebook Pixel:
- Go to the Facebook Events Manager and create a new Pixel.
- Copy the Pixel ID.
- Add Facebook Pixel to Your Elementor Site:
- Use Rank Math or the PixelYourSite plugin to install Facebook Pixel on your site.
- Paste your Pixel ID into the plugin settings and configure events like page views, add to cart, or purchases.
- Verify the Pixel is working by using the Facebook Pixel Helper Chrome extension.
Advanced Tip: You can track specific actions (e.g., form submissions, button clicks) by setting up custom events through the Facebook Events Manager.
7.3 Using Heatmaps to Understand User Behavior
Heatmaps give you a visual representation of where users are clicking, scrolling, and spending the most time on your site. This is invaluable for optimizing layouts, button placement, and overall site design.
How to Set Up Heatmaps
- Sign up for a heatmap tool like Hotjar or Crazy Egg.
- Install the tracking script on your site using a plugin or by adding it directly to your theme header.
- Review heatmap reports to see which sections of your pages get the most interaction, and adjust your layout accordingly.
Example: If your call-to-action button isn’t getting enough clicks, use heatmap data to test new positions or styles.
7.4 Conversion Rate Optimization (CRO)
Conversion rate optimization is about improving your site’s ability to turn visitors into customers, email subscribers, or leads. Elementor Pro’s Pop-ups, Forms, and A/B testing tools can help boost conversions.
Improving Call-to-Action Placement
- Use heatmap data to identify the best placement for your call-to-action buttons (CTAs).
- Ensure CTAs are above the fold on important pages, so visitors see them without scrolling.
- Use contrast colors on your buttons to make them stand out from the rest of the content.
A/B Testing for Better Results
Elementor Pro doesn’t offer A/B testing natively, but you can integrate tools like Google Optimize or use third-party plugins like Split Test for Elementor.
- Set up an A/B test to compare two variations of an important element (e.g., button color, headline, layout).
- Track conversion rates for each variation over time.
- Implement the version that performs best and continue testing other elements.
Example: Test different form placements or button colors to see which version leads to higher conversion rates.
7.5 Optimizing Forms for Better Conversions
Forms are critical for capturing leads and driving conversions. Elementor Pro’s Form Widget makes it easy to create custom forms, but optimizing those forms is key.
Form Optimization Tips
- Simplify your forms: Only ask for the information you really need. Too many fields can reduce submission rates.
- Use a clear call-to-action: Buttons like “Submit” are too generic. Use more compelling phrases like “Get My Free Guide” or “Join the Community”.
- Test placement and design: Place forms prominently above the fold or near content that encourages action (e.g., next to a testimonial).
Pro Tip: Use Rank Math to set up conversion tracking for form submissions by integrating it with Google Analytics.
7.6 Tracking Key Metrics and Goals in Google Analytics
It’s important to monitor specific metrics to ensure your website is performing well. Here are key metrics to track using Google Analytics:
- Bounce Rate: The percentage of visitors who leave your site after viewing only one page. A high bounce rate can indicate issues with your content or design.
- Conversion Rate: The percentage of visitors who complete your desired action (e.g., sign-ups, purchases).
- Average Session Duration: The average amount of time visitors spend on your site. The longer, the better!
- Traffic Sources: Understand where your visitors are coming from (e.g., organic search, social media, direct traffic).
Setting Up Goals in Google Analytics
- Go to Google Analytics > Admin > Goals and create a new goal.
- Choose a goal type (e.g., destination for tracking form submissions, duration for session time).
- Track these goals to measure conversions over time.
Example: Set a goal to track form submissions and monitor how many users complete your forms each week.
Conclusion: Data-Driven Optimization for Better Performance
By setting up Google Analytics, Facebook Pixel, and heatmaps, you can gather valuable data about your visitors’ behavior. Combine these insights with A/B testing and form optimization to continually improve your site’s performance and conversion rates.
Conclusion: Building a High-Performing, SEO-Optimized Website with Elementor
Congratulations! You’ve made it through this comprehensive guide, and now you have all the tools you need to build and optimize a beautiful, fast, and SEO-friendly website using Elementor.
Key Takeaways:
- Elementor Free Widgets: You learned how to use Elementor’s free widgets to create professional websites, and work around some of the limitations by using plugins.
- Elementor Pro Widgets: Upgrading to Elementor Pro opens up advanced features like dynamic content, WooCommerce integration, pop-up forms, and more.
- Mobile Responsiveness: Ensuring your site is mobile-friendly is critical for both user experience and SEO. You can easily make adjustments using Elementor’s responsive design tools.
- Global Design Settings: Consistency is key! Using Elementor Pro’s global colors, fonts, and widgets ensures your site looks cohesive and is easy to manage.
- Performance and SEO Optimization: Optimizing your site for speed and SEO ensures that your website ranks higher in search engines and provides a fast, user-friendly experience.
- Tracking and Analytics: With Google Analytics, Rank Math SEO, and conversion tracking tools like Facebook Pixel and heatmaps, you can monitor your site’s performance and continually optimize for better results.
What’s Next?
Now that you’re equipped with everything you need to create a stunning and functional website, it’s time to put your knowledge into action! Start building your site using the steps outlined in this guide, and don’t hesitate to refer back to the guide when you need tips or refreshers.
Continue Learning with Cluster Content
If you want to dive deeper into specific topics, explore my blog that goes further into advanced Elementor features, SEO strategies, and performance optimization.
Get Started Today
If you’re ready to take your website to the next level, consider upgrading to Elementor Pro to unlock even more powerful tools and features.